Fabric Flower Pin = Gift Wrap Bow

Last week I met a friend for lunch. We were celebrating her birthday.  I had her gift for a while but had not wrapped it. It was a lovely garden stone. It can be laid flat in a flower garden or it has the option of hanging on a porch. 
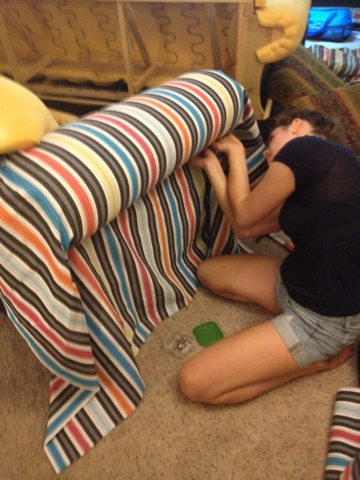
It was too heavy for a gift bag. I wrapped it in tissue and used a large shirt box. I covered it in a lime wrapping paper but I didn’t have a bow that was big enough. I decided I wanted to make a bow that could be used as a pin on a scarf, hat, sweater or even a tote or handbag.

I used pinking shears to cut a long strip. I used it like ribbon and wrapped and taped it around the top quarter of the box. 

The inside of an embroidery hoop makes a great template for a yo-yo. I traced around it on the backside of the fabric. Cut it out and took a large running stitch around the edge. I love making yo-yo’s.
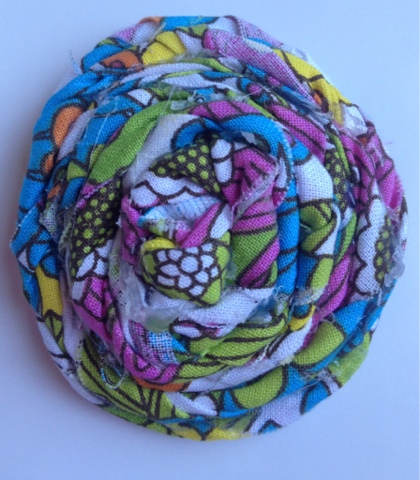
I found scrap complementing fabric and made two rolled flowers. 
Once I put the three together, I knew the yo-yo needed a little something extra. I went to my button jar and tried several different options. I settled on this beauty.
I love polka dots.
I finished the back by cutting a piece of felt to fit around all three flowers. Hot glue is an amazing invention. I then added a pin clasp. To attach the pin to the package, I opened the pin and stuck it in to the fabric strip. I love how my  handmade bow turned out! Do you have a wrapping trick that you use?


sharing:


Cinnamon Ornaments and A Month Of Thankfulness – Day 7

Last week our daughter visited for a few days. We decided to do a bit of crafting, in anticipation of the holidays, while she was here. One of the first projects we worked on was the tried and true Cinnamon Ornaments. Oh, they made my house so divine. We made them to use on our gifts in place of bows.

First we had to gather our supplies. This is such a simple recipe, not much was needed. 

Ingredients:
1 cup applesauce
1 to 1 & 1/2 cups ground cinnamon (Walmart has a brand, 5th Season, for only .50 cents for 2.37 oz., I used almost 3 for the recipe)
cookie cutters
wax paper
cookie sheet with parchment paper

Mix in a large bowl 1 cup each applesauce and cinnamon. Mix. You will need to use your hands and mix well. If too soft and sticky add the extra cinnamon, if too stiff add just a bit of applesauce until you get a good consistency to roll with a rolling pin. This make take you a little bit of time but it is worth it to get it right.


Place wax paper on counter and sprinkle with cinnamon. Sprinkle cinnamon and rub it on your rolling pin. Place dough on to wax paper and roll to 1/4″ thick. Using cookie cutters, cut out ornaments and place on the parchment paper lined cookie sheet. I used a wooden skewer to make a hole at the top of each ornament.

Preheat oven to 200 degrees and bake 2 hours. Turn off and leave until oven is cool. We did these in the evening and just left them overnight. They turned out perfectly and my house smells oh, so delicious. 


Beware! Probably goes without saying, these are so not edible! My son came in while we were working on these, picked one up and almost had it to his mouth before Hanna realized it and stopped him. I cannot imagine the burn that much cinnamon would cause. Ugh! So not for eating, just smelling. 🙂

We have stored our cinnamon ornaments wrapped in tissue paper and in a plastic storage bin. This will help the ornaments keep their wonderful scent until we are ready to use them for gift-wrapping. 

A Month Of Thankfulness – Day 7 – I am so thankful for the insurance representative I spoke to this morning. He went out of his way to be helpful and kind. I have severe asthma. I take three medicines. The one that helps me the very most, our insurance has stopped covering it. So, that one medicine cost me $225.00 a month! Yikes. We already pay almost a thousand a month just for our health premium. When I called to see if I could appeal the decision, etc. he was able to get me signed up for a three month mail order supply for $155.00!!! Wow, what a difference. I am so thankful for the $520.00 savings! Yay! 

sharing:
http://www.littlebeckyhomecky.com/2012/11/fantabulous-friday-38/
http://navywifeypeters.blogspot.com/2012/11/submarine-sunday-6.html

Autumn Scents and Mug Swap

While in Colorado, my friend, Jill, and I made up these sweet little bags of Autumn Scents to give to her friends at a Fall Festival she helped to organize. They were easy to do, look beautiful and smell so delicious! 

Autumn Scents 

Ingredients:
Dehydrated lemon and oranges slices
Cinnamon sticks
Star of Anise
Cloves

How to:
We started by slicing lemon and oranges thinly and placing on a cookie sheet. We didn’t have a dehydrator instead we preheated the oven to 175 degrees and baked the fruit for 7 hours. We put them in overnight and they turned out perfectly. We awoke to the house smelling very citrusy. Once the fruit was cooled, we placed several slices of each in to the bag. 

We broke the cinnamon sticks in half and added 3-4 sticks, 2 Star of Anise and then a small handful, probably around 20, of cloves. We gathered the bag and tied it with ribbon.

We purchased the clear bags at Hobby Lobby but you could use small jars or even snack size zip lock bags. The orange ribbon tied off with a simple knot turned out to be a festive touch. 


How to use:
Pour entire bag of ingredients in to a small pot and cover with water. Bring to a boil. Turn heat to low and simmer to fill your home with the wonderful scents of Autumn. You may keep the pot on the back of your stove refilling the water as needed. We boiled our trial pot all week and each day it still smelled wonderful. 

See the steam rising from the pot. It is the wonderful scent of Autumn!


MUG SWAP

I participated in a mug swap and had to hurriedly get mine in the mail before leaving on our trip. In fact, I took it to the post office and then we promptly headed to the airport. In my hurry, I forgot to take a picture of the mug I sent. 😦  It was a bright lime green SC state mug. I included some hot chocolate packets and a SC postcard. I received my mug while I was gone. It was so fun to have a package waiting on me! I received this wonderful owl mug and goodies. I am sooo looking forward to filling this mug with my soups and stews this winter. Isn’t it the cutest? The little owl faces are so adorable. Thank you, Kayla from Kayla’s Creations! I love it. 🙂 And I love Kayla’s blog. Go check it out. 

sharing:

http://www.thecraftyblogstalker.com/2012/10/blog-stalking-thursday-62.html
http://www.livelaughrowe.com/live-laugh-linky-31/
http://www.firefliesandjellybeans.com/2012/10/show-off-your-stuff-party-148.html
http://www.happyhourprojects.com/2012/10/happy-hour-friday-1012.html
http://www.littlebeckyhomecky.com/2012/10/fantabulous-friday-34/
http://www.iheartnaptime.net/sundae-scoop-link-party-50/
http://sewmanyways.blogspot.com/2012/10/sew-darn-crafty-linking-partyweek-87.html
http://www.flamingotoes.com/2012/10/think-pink-sunday-no-82/

http://mommyssweetconfessions.blogspot.com/2012/10/sundays-sweet-confessions-link-party-11.html
http://www.the36thavenue.com/2012/10/craft-room-makeover.html

http://www.adornedfromabove.com/2012/10/homemade-soft-scrub-and-wednesdays.html
http://www.heatherlyloves.com/2012/10/coffee-mug-swap-reveal-link-up.html
http://www.fivedaysfiveways.com/2012/10/feature-friday-free-for-all-39-free.html
http://www.delicateconstruction.com/2012/10/delicately-constructed-friday-and.html
http://www.stuff-and-nonsense.net/2012/10/welcome-to-fridays-unfolded_25.html
http://www.familyeverafterblog.com/2012/10/once-upon-weekend-blog-bash-recap.html
http://www.thirtyhandmadedays.com/2012/10/linky_party_111/

http://www.herecomesthesunblog.net/2012/10/fabulous-friday-49.html
http://www.happygoluckyblog.com/2012/10/shine-on-friday-with-giveaway-hosted-by.html
http://www.sixsistersstuff.com/2012/10/strut-your-stuff-saturday-link-party_26.html
http://www.cheeriosandlattes.com/saturday-show-tell-34/
http://www.thegingerbreadblog.com/2012/10/sweet-saturday-link-party-v62.html

Fall Felt Leaves Wreath

I completed my first project with the new wool blend felt. I had this smaller Styrofoam wreath that I wrapped in a variegated yarn. I used Lime Riot’s felt leaf tutorial that she shared on Leslie’s Art and Sew. I used all the colors for Crafty Sheep’s September Color Challenge. This little Fall wreath will find it’s home on the shelf above my sewing machine. I will show the complete shelf next week.

sharing:

New Arrival – Felt!

I received my first order of wool blend felt. I am so excited! I can’t wait to see what crafty creations I can make with all this felty goodness. I also ordered and received the book, 
There really are some super-cute ideas. But my first felt project will be some form of  Limeriot’s Fall leaves for the Craft Sheep September Color Challenge. 
Do you work with felt and if so, what is your favorite book or blog about felt?

Elmer’s Designer Masking Tape Frame

Not too long ago, a sweet bloggy friend, sent me three rolls of Elmer’s Designer Masking Tape to try. I love the blue and green dots. I already had an inexpensive frame from Ikea that was awaiting a project and decided to combine the two.

I started, removed, started, removed and started again until I decided to place the tape on the outer edges. The great thing about this tape, it is totally repositionable. I didn’t waste any of the tape in my indecisive tries. 
For a first time try, I like the easy use of the tape. I now see why there are so many projects on Pinterest using washi tape. After finishing, I printed off The South printable. I knew when I saw it that I would use it one day. Having lived in MS for the first 21 years of my life and SC for the last 26, I can unequivocally say this print is absolutely true. 🙂

sharing: 

Rolled Fabric Flower Hat Pin

I enjoy wearing hats, nothing fancy, just fun comfortable hats. I especially love a modified baseball hat. I found this little cutie at our local Charming Charlie store back in the Spring. I decided it would be nice to have a little color added to it and use the Antsi-Pants Rolled Fabric Flower Tutorial to make up a Rolled Flower with a pin attached to the back. It is a quick, easy and inexpensive way to give a hat or tee a new look.

sharing:

Pay It Forward

Tilda’s Twisted Life was hosting her first Pay It Forward. It sounded like a fun way to meet a few people who love crafty goodness and be an encouragement to others. Who doesn’t like to get a special handmade gift in the mail?  I would love for you to join me in my Pay It Forward. I need three people to join me. Please read the rules before committing to make sure you are willing to follow through.  


  Here are the rules:
1. I will create a crafty gift for each of the first three people who comment to this post. This is a surprise, and will arrive to you anytime within the next 365 days.

2. In signing up for Pay it Forward, you are committing yourself to the project…someone pays it forward to you, so you pay it forward to others! Just post this, or something similar so others can get involved. Basically you will create your own post where you create gifts for 3 people as well.

3. You need to have an active blog of your own…{or some way to post up your PIF info like a flickr, pinterest, or Facebook account. Basically you’ll need a place to announce your own PIF and to post some pics of the process.}

4. After commenting on this post, post something similar on your blog…so you can spread the pay it forward love. I will email you asking for your mailing address {and the online address where you are posting} so I can get your crafty treat in the mail. Please make sure your email address is visible on your profile or leave it in the comment.


I am looking forward to seeing who signs up!

Two little kitchen towels.


The Saga of Our First Reupholster

My daughter, Hanna, was given, from my mom, a sofa, loveseat and recliner that was gently used. Hanna and many friends heavily used the furniture during Hanna’s college years. At one time, she lived in a very large house with 6 other people, two dogs and a cat. Well, you get the picture. The furniture base was still in good shape but the upholstery was in need of some help. Hanna and I went to Ikea and found this stripe fabric on sale for 3.99 a yard. It is a heavy-duty canvas and very contemporary. We had initially decided to make slip-covers. Hanna decided we should try and reupholster! I have NEVER reupholstered anything, nor has Hanna. But hey, I can read a blog! I searched around through Pinterest and my blog roll and found several sites that were helpful and we gave it a try. We recovered the loveseat pictured below and the sofa, which I failed to take a photo. The sofa is a bit better, as we learned a few tricks in covering the smaller loveseat. It took us about 9 hours to just get the old fabric off because there were thousands of staples to be removed. We spent an additional day covering the loveseat and about a third of the sofa before falling over from exhaustion. Hanna had to work the third day so I tackled all the sewing for the sofa and we finished it up the third night. I sewed the last stitch at 9:00 PM and by 9:15 I was in the truck to drive my 2 1/2 hour drive home. It was a fun experience because I shared it with my sweet daughter. It was also easier in some ways and much harder in others than I thought. I didn’t imagine the difficulty of removing the fabric and staples. Both of our hands were swollen the following day from griping needle nose pliers to pull staples. One thing that was helpful, each step of removing the fabric, we snapped a photo on my iPhone. We were able to refer back when we had a question of “What next?”  The sofas are contemporary and fits Hanna’s personality and gives her tons of colors to coordinate the rest of the apartment. 

After
&

Before
Hanna hard at work.

Sharing at:

SEW Yo-Yo Letters

I am still working on wall decor for my sewing room. I found these letters at Hobby Lobby for $1.99 each. I posted about making yo-yo’s last week on my Wednesday Work in Progress.

I used tall thumb tacks on the back, not pushed all the way in, to add “legs” to the letters. This helps to keep your paint project off the surface underneath and makes painting edges a snap.


I had purchased a cream paint initially but once the yo-yo’s were completed and I laid them out, I decided I needed a bit more color behind them. 
I scurried to Walmart yesterday and picked up a bottle of Plaid Folkart Paint for $.97. 

Before hot gluing the yo-yo’s on to the front of the letters, I glued soda can pop tops on the top edge of all the letters for hanging.
I then hot glued the back of each yo-yo and pressed on to the front of the letters. I love how this project turned out. What do you think?

Linking up to:
http://www.serendipityandspice.com/2012/04/manic-monday-linky-party-15.html
http://anoriginalbelle.blogspot.com/2012/04/m-i-y-monday-25-link-up.html
http://singingthreelittlebirds.blogspot.com/2012/04/inspire-me-monday-busy-busy.html
http://boogieboardcottage.blogspot.com/2012/04/welcome-to-69th-masterpiece-monday.html
http://sewchatty.blogspot.com/2012/04/made-with-love-link-up_7058.html
http://www.sewcando.com/2012/04/super-special-craftastic-monday-link.html
http://todayscreativeblog.net/do-it-yourself-crafts/
http://www.tipjunkie.com/homemade-projects-424/
http://www.notjustahousewife.net/2012/04/show-me-what-ya-got-71.html
http://www.the36thavenue.com/2012/04/easy-diy-projects-sticker-time-51.html
http://www.gingersnapcrafts.com/2012/04/wow-me-wednesday-48.html
http://savvysouthernstyle.blogspot.com/2012/04/wow-us-wednesdays-63.html
http://www.houseofhepworths.com/2012/04/25/hookin-up-with-hoh-97/
http://www.craftionary.net/2012/05/friday-fun-party-and-features-18.html

bunnyhillblog.com/

Sweet Sophistication with a Touch of Whimsy

domestic diva, M.D.

my mother raised the perfect housewife...then I went to med school