Fall Felt Leaves Wreath

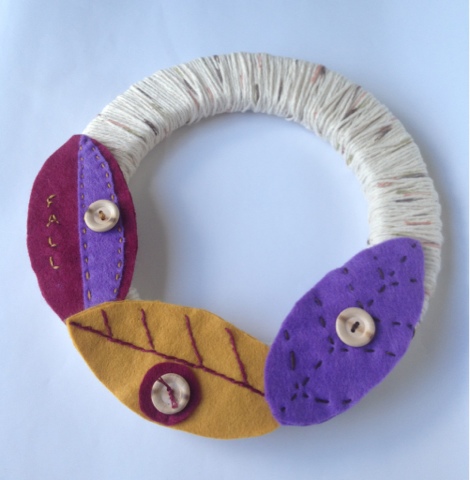
I completed my first project with the new wool blend felt. I had this smaller Styrofoam wreath that I wrapped in a variegated yarn. I used Lime Riot’s felt leaf tutorial that she shared on Leslie’s Art and Sew. I used all the colors for Crafty Sheep’s September Color Challenge. This little Fall wreath will find it’s home on the shelf above my sewing machine. I will show the complete shelf next week.

sharing:

Making Those Best Laid Plans

Redwork Embroidered Monthly Snowmen

I haven’t felt too crafty the last few weeks. We have been busy painting kitchen cabinets and walls. The house seems to be in chaos and I am one of those rare individuals who cannot focus on anything creative unless all the house is in order. Crazy, I know. Most artsy people thrive on chaos but not me. I sort of shut down creatively. But…I did see on the calendar that September is National Sewing Month. That has put me to thinking and planning. What do I need or want to sew, machine or hand, in the month of September? My list, I am sure, is incomplete but I am hoping it will spur me in to action. 

Piece the embroidered monthly snowmen quilt.
Embroider quilt pieces for Christmas gift.
Sew daughter’s tiger print dress using this tutorial pattern.
Sew floor cushions for daughter.
Embroider bacon kitchen piece for son. (Bacon is his favorite food)
Sew wonder wallets that are cut out.
Embroider my monthly sew alongs.
Christmas stockings for my family.
Work on yo-yo stash.
Sew a few mug rugs for gift stash.
Cover for ironing board.
Hoop projects for wall in sewing room.

This list should keep me busy for a couple of months! What about you? Do you have a sewing list for September? Share it here! I love to get inspired by projects made by you!

Second half of monthly redwork snowmen.

sharing:

French Knot Letter F

For the Crafty Sheep July Color Challenge I decided to try my hand at lots of french knots. I found a font I thought would be fun and enlarged it to the size that would fit the hoop I chose. My original plan was to do each color around each side and finish with the orange thread. The problem I had was I ran out of room when stitching the inner yellow except for the upper left part of the letter. I then decided the part that was an open area would look great filled in with the orange. I am happy the way it turned out. I dug around in my stash and found this polka dot fabric that has each color in it plus pink. Now, I am not much of a pink or purple girl but I do think the covered hoop and the yo-yo’s give the hoop a great finish. 

One more hoop for the wall in my sewing room. I can’t wait to have enough to hang them all. 
Sharing:
http://www.the36thavenue.com/2012/08/best-diy-projects-and-link-party-67.html
http://www.impartinggrace.com/2012/08/grace-at-home-no-20.html
http://www.houseofhepworths.com/2012/08/01/hookin-up-with-hoh-110/
http://www.thetaylor-house.com/2012/08/taylor-house-thursday-19.html
http://www.twosasters.com/2012/08/tgif-30-share-what-you-did-this-week.html
http://www.craftionary.net/2012/08/best-diy-crafts-and-ideas-party.html
http://www.littlebeckyhomecky.com/2012/08/fantabulous-friday-24/
http://myturn-evelyn.blogspot.com/2012/08/freedom-fridays-13.html
http://www.craftjunkietoo.com/2012/08/tgif-linky-party-60.html
http://www.doodlesandstitches.com/2012/08/fabulous-friday-link-party-12.html
http://snips-and-spice.blogspot.com/2012/08/sunday-slice-its-party-6.html
http://www.countrymommacooks.com/2012/08/link-and-greet-28.html
http://www.flamingotoes.com/2012/08/think-pink-sunday-no-72/
http://www.iheartnaptime.net/sundae-scoop-link-party-37/
http://thesoutherninstitute.com/2012/08/creative-me-link-up-28.html/
http://anoriginalbelle.blogspot.com/2012/08/make-it-yourself-monday-40-link-up.html

Stitchy Steps

I have recently been asked by friends who don’t stitch, how do I get started with a project and then what are the steps. I am no expert but I am happy to share my process. 


Step 1: Choose a pattern. Sometimes I choose a printed pattern that I trace using my new handy-dandy light box, other times I might use a transfer pattern. I so want to be one of those artistic types that can design their own pattern from scratch but that is not me. I am hoping my artistic daughter will design some patterns. For this hoop monogram with tassel I chose it from a book of iron-on transfer patterns I purchased at Hobby Lobby. I am sure I help keep that store in business. 😉

Step 2: Choose your fabric. If you are tracing your pattern on to the fabric you can use almost any type but when using an iron-on transfer the fabric has to be heat tolerant.
I chose an Osnaberg linen type fabric that I had in my stash.

Step 3: Prepare the fabric by determining the amount you need and then pressing it with an iron to remove any wrinkles.


Step 4: Cut the transfer pattern and iron it on to the fabric following pattern package directions or trace your pattern on to the fabric.
Step 5: Hoop the fabric in to a working hoop. I like to use a plastic hoop for embroidering. There are those that do not use a hoop at all. I like the stabilization a hoop gives the fabric.
Step 6: Choose the thread color/colors you want to use in your project. This project is for one thread choice. Sometimes I may pull out 30 colors to choose when doing a multi-color project, like here

Step 7: Stitch! I would say this my favorite part but I also really enjoy choosing pattern, fabric, thread, etc. For wonderful instructions on embroidery stitches, I like to go shiny happy world blog and her wonderful free instructions.

Step 8: Decide how you will finish off your project. I painted a small wooden hoop. There are so many options from framing or adding it in to a sewn piece, etc. I am sending this hoop as part of the Happy Hour Christmas in July exchange. My recipient, Leslie Marquez Designs, asked for supplies for her jewelry designs and I wanted to add a little something extra. She had shared colors in her home and I decided a brown hoop with this M monogram would be a good addition to the supplies.
Step 9: After completing the stitching and allowing the hoop to dry, I placed the stitched piece in to the finishing hoop. Then I trimmed around the edges leaving enough to fold around to the back and stitch a running stitch to gather the fabric.
Step 10: Finishing the back. I chose to cut a piece of felt and stitch it to the back of the piece for a finished look. 
And there you have it. My little monogram embroidery stitched from beginning to the end. 

Bead supplies and monogram M for my Christmas in July package.

sharing:

http://www.thecraftyblogstalker.com/2012/07/blog-stalking-thursday-51.html
http://www.happyhourprojects.com/2012/07/happy-hour-friday-0727.html
http://www.craftjunkietoo.com/2012/07/tgif-linky-party-59.html
http://www.littlebeckyhomecky.com/2012/07/fantabulous-friday-23/
http://myturn-evelyn.blogspot.com/2012/07/freedom-fridays-12.html
http://www.craftionary.net/2012/07/link-party-diy-crafts-recipes.html
http://shabbynest.blogspot.com/2012/07/frugal-friday_26.html
http://www.delicateconstruction.com/2012/07/delicately-constructed-friday_26.html
http://frenchcountrycottage.blogspot.com/2012/07/feathered-nest-friday_26.html
http://romantichome.blogspot.com/2012/07/show-and-tell-friday_26.html
http://www.stuff-and-nonsense.net/2012/07/welcome-to-fridays-unfolded_26.html
http://twenty-eight-0-five.blogspot.com/2012/07/potpourri-friday-34.html
http://www.atthepicketfence.com/2012/07/its-inspiration-friday-no-75-welcome.html
http://www.thirtyhandmadedays.com/2012/07/linky_party_98/
http://www.joyinthejumble.com/2012/07/pomp-party-28.html
http://herecomesthesun-kelly.blogspot.com/2012/07/fabulous-friday-36.html


Little Mermaid Hoop

I found this adorable pattern posted on Flickr’s Needle-n-Me‘s photostream. I originally saw her post in Hoop Love Vintage Transfers group and knew I wanted to stitch it. The fabric is a very light blue cotton that I had in my stash. I used tiny backstitches on the fish and mermaid bodies. The fish lips and eyes are satin stitch. The water is stem stitch. I love how this stitching turned out. 


Our guest bath has evolved into a bit of a beachy feel. The walls are painted a light blue/gray and I use celery and white as the accent colors in the rug and shower curtain. I have a free-standing chest painted black. The top of the chest, shown here, holds a few beach type decorations. The framed print was a birthday card from a friend this year. The title, A Day At The Beach. The shell sitting in the front of it was found a few years ago during our yearly Hilton Head, SC vacation. In the center, the candle votive was a thank you gift from one of my daughter’s high school teachers. I filled it with shells we have picked up, including the star fish. The angel holding the shell to her ear was a gift from my sister. The book, in a house by the sea, my daughter gave it to me while in Hilton Head a few years ago. I love how all the gifts and finds go together so beautifully to create a cohesive feel. I think my little mermaid hoop fits right in. 

The card says:

a day at the beach

It can make us feel like
all our cares are an ocean away.
Sun on our shoulders, feet in the sand, 
      cool beverage in hand…
the waves roll in, our thoughts roll out
 and all is right with the world again.

Doesn’t that sound perfect? 

sharing:

Crafty Sheep June Challenge – A Double Hoop Embroidery


I am a few days late, okay, make that 6 days late in completing and posting my Crafty Sheep June Challenge. I found the Stitcher’s Revolution packet Sew Crafty at Hobby Lobby a few weeks ago. I am working on a hoop collection for a wall in my sewing room and thought this pattern packet would make some fun additions. I chose to make the embroidery hoop design. To be able to use all the June colors was a challenge. I managed to get a tiny bit of the deep red in the bolt for the hoop fastener. The silvery blue was used in the needle and and the top of the hoop brackets. The deeper gold was stitched for the screw. I love how it turned out. I used the following stitches: Satin stitch for the screw, bolt and hoop. Back stitch around the hoop and the needle. Stem stitch for thread attached to the needle. Running stitch for the embroidery design. Now I am to decide what to make for the Crafty Sheep July Challene. Why don’t you join in the fun?
Found this pattern set at my local Hobby Lobby for $ 2.95.

sharing:

http://www.doodlesandstitches.com/2012/07/fabulous-friday-link-party-9.html
http://my1929charmer.com/sundays-best-38-par-tay/
http://www.herecomesthesun-kelly.blogspot.com/2012/07/fabulous-friday-33.html
http://www.bystephanielynn.com/2012/07/sunday-showcase-party-no-109.html
http://shakentogether.blogspot.com/2012/07/whats-shakin-link-party-16-party-faves.html
http://www.serendipityandspice.com/2012/07/manic-monday-linky-party-26.html
http://anoriginalbelle.blogspot.com/2012/07/make-it-yourself-monday-36-link-up.html
http://singingthreelittlebirds.blogspot.com/2012/07/craft-linky-party-inspire-me-monday-hot.html
http://boogieboardcottage.blogspot.com/2012/07/welcome-to-80th-masterpiece-monday.html
http://sewchatty.blogspot.com/2012/07/made-with-love-link-up_08.html
http://www.sewcando.com/2012/07/craftastic-link-up-giveaway-news-new.html
http://thesoutherninstitute.com/2012/07/creative-me-link-up-24/
http://www.flourmewithlove.com/2012/07/mix-it-up-monday_08.html
http://todayscreativeblog.net/craft-paint/
http://www.tipjunkie.com/homemade-projects-7-10/
http://www.notjustahousewife.net/2012/07/show-me-what-ya-got-82.html
http://abowlfulloflemons.blogspot.com/2012/06/one-project-at-time-tuesday-link-party.html
http://shwinandshwin.blogspot.com/2012/07/link-party-26.html

A Little Stitching & A Lot Of Traveling

The last two weeks I have spent more time in a car than anywhere. In the midst of our travels, I found time to stitch this Tea Time hoop and make these fabric button magnets for the fridge. I purchased the embroidery pattern from Urban Threads. My favorite part of this stitchery is the french knots I used for bubbling tea. These two items are being sent to my recipient in the Craftaholics Anonymous Gift Exchange

Fabric shopping and pool day.

The Bone Garden Cantina

Two weeks ago, I spent two days with my daughter in Atlanta. We shopped and ate the first day, visiting a great quilt store, Intown Quilters, a crafters boutique, The Beehive, and lastly went to an outdoor craft festival. The second day was pure relaxation at the pool. We had the entire pool to ourselves and then we headed to lunch at The Bone Garden Cantina, where we had wonderful food. The murals on the wall were so interesting I have included a few photos. The beautiful woman? Our daughter, Hanna. 🙂

Stan and I traveled to DC on Wednesday of last week. We visited our dear friend, David’s, grave.  Our friend, LouCinda’s father, passed early last year and was cremated. His funeral at Arlington was the Monday of last week. He was a wonderful man, a WWII Air Force Pilot veteran and hero. We found and visited his resting place while we were there.


On Friday, we drove over to Baltimore, MD. We have never been to the city and loved it. We didn’t love the 105 degrees but the city was beautiful. 

Water Taxi Views

That evening, we had wonderful club seat tickets to see the Orioles play the Indians. We are huge baseball fans and getting to attend a game at Camden Yards was a highlight of the day. It is a beautiful stadium and we had a wonderful time.

We are home now. Road weary but so glad to have had the time together. This week is shaping up to be a productive week and I hope to have more crafty items to show as the week progresses.


Sharing here:
http://www.craftaholicsanonymous.net/summer-2012-handmade-gift-exchange-linky-party
http://www.thesoutherninstitute.com/2012/07/creative-me-link-up-and-giveaway.html
http://my1929charmer.com/sundays-best-37-par-tay/
http://www.doodlesandstitches.com/2012/06/fabulous-friday-link-party-8.html
http://www.happyhourprojects.com/2012/07/happy-hour-friday-0706.html
http://myturn-evelyn.blogspot.com/2012/07/freedom-fridays-9.html
http://www.thirtyhandmadedays.com/2012/07/linky_party_95/
http://www.fivedaysfiveways.com/2012/07/feature-friday-free-for-all-28.html
http://www.craftionary.net/2012/07/friday-fun-party-and-features-57.html
http://www.joyinthejumble.com/2012/07/pomp-party-25.html
http://www.the36thavenue.com/lets-party
http://www.504main.com/2012/07/tickled-pink-no-105.html
http://www.countrymommacooks.com/2012/07/link-and-greet-24.html

Crafty Sheep’s May Color Challenge

Crafty Sheep is giving a color challenge each month for any type of craft. I wanted to practice a few embroidery stitches and found this fabric in my stash that matched perfectly. This was my first time embroidering on the print of a fabric. It was easy, fun and I love the colors. 
Check out Crafty Sheep’s blog for June’s color challenge and join us this month.
sharing:

Memorial Day Weekend Camping Trip & A Little Stitching

One of my daughter’s favorite foods is mac and cheese. When I spotted this embroidery pattern on Flikr’s mindboggld account at http://www.flickr.com/photos/mindboggld/4675675423/in/pool-54411636@N00/
I knew I had to stitch it up for her. I decided to crayon tint the cheese, heart and macaroni. I love how it turned out. It is stitched on a kitchen cotton towel and was stitched while camping.

We camped on Thursday night until this morning at the beautiful Black Forest Camping Resort. (http://www.blackforestcampground.com/)  We headed to NC as soon as Stan was home on Thursday evening. We set our tent (the one with a light switch and a raised queen sized air mattress and yes, a portable air conditioner) up and two pop-up covers for our kitchen area and picnic table. We added a little decorating for Memorial day and relaxed.
Stan enjoying lunch Friday before hitting the pool.
Very few campers came until Friday evening, that meant empty pool for Stan and me!

Our friends, Adonia and Michael, came on Friday afternoon. We enjoyed relaxing at the site. Stan cooked steak on our cast iron griddle, potates, salad and bread. I made a cake in our toaster/convection oven. Yummy.

The White Squirrel Festival was happening in Brevard, NC. Lots of craft booths, food, live music and derby car races. We stopped our meandering to check out the race.

This was our first time seeing a derby race. 

We packed up and headed home this morning. It was a very relaxing weekend. 

As always, we are so grateful to all our military and their families. We know personally the sacrifice that is made by so many. May we never forget our fallen heroes.

Sharing: 

May Stitch Along, Dancing Veggies Flour Sack Towel

I participated in the May Stitch Along with New Embroidery with Vintage Patterns on Flikr. The options were so varied. The month of May is host to many national days and we could choose from any of the following: Dance, BBQ, Salad or Flowers. I chose to combine the dance and salad combination with my Dancing Veggies pattern. I found the pattern on Hoop Love Vintage Transfer by mmaammbr. The link for the pattern is  http://www.flickr.com/photos/29529717@N04/6330079313/in/set-72157612501164047 if you would like to print it off for your use. 


I printed the pattern and the traced it with a Clover Transfer Pencil.

After tracing the pattern, turn pattern pencil side down on to the surface that you want the pattern to appear and iron with a hot (no steam) heat.

The pattern is transferred lightly on to the fabric.


When deciding which pattern to stitch, I was looking for one that would be easy to crayon tint. I have never done any tinting but I had seen little dear tracks tutorial, http://littledeartracks.blogspot.com/2010/06/crayon-tinting.html, and loved the effects. It was easy and I loved this new 
technique.

I then followed little dear track’s instruction and lightly colored the areas I wanted to tint. I then placed a clean piece of white printer paper and ironed the wax off. This set the tint but removed the wax. Easy peasy.


I finished the flour sack towel by ruffling a 2 1/4″ strip of fabric. I had the fabric in my stash. I followed the directions from Made By Lex, http://www.madebylex.com/2010/12/how-to-ruffle-fabric-with-your-sewing-machine.html, to make my ruffle and then sewed down the middle seam to attach it to the towel. 

I love how my little kitchen towel turned out. Aren’t the veggies cute? My son was visiting last night and said they were creepy! LOL. 


Sharing:
http://funkypolkadotgiraffe.blogspot.com/2012/05/too-cute-tuesday-linky-par-tay-85.html
http://todayscreativeblog.net/make-something-creative/#more-10792
http://www.tipjunkie.com/homemade-projects-522/
http://abowlfulloflemons.blogspot.com/2012/05/one-project-at-time_22.html
http://www.gingersnapcrafts.com/2012/05/wow-me-wednesday-52.html
http://savvysouthernstyle.blogspot.com/2012/05/wow-us-wednesdays-67.html
http://thediydreamer.blogspot.ca/2012/05/from-dream-to-reality-linky-party-17.html
http://somedaycrafts.blogspot.com/2012/05/whatever-goes-wednesday-118.html
http://www.the36thavenue.com/2012/05/party-time-56.html
http://www.craftionary.net/2012/05/friday-fun-party-and-giveaway-with.html
http://www.skiptomylou.org/2012/05/28/made-by-you-monday-102/
http://www.thesoutherninstitute.com/2012/05/creative-me-link-up_27.html
http://www.itsoverflowing.com/2012/05/overflowing-with-creativity-526.html
http://www.flourmewithlove.com/2012/05/mix-it-up-monday_27.html
http://my1929charmer.com/sundays-best-32-par-tay-giveaway-winner/
http://www.happyhourprojects.com/2012/05/happy-hour-friday-0525.html
bunnyhillblog.com/

Sweet Sophistication with a Touch of Whimsy

domestic diva, M.D.

my mother raised the perfect housewife...then I went to med school